

How to Measure a Replacement Screen for Screening Equipment
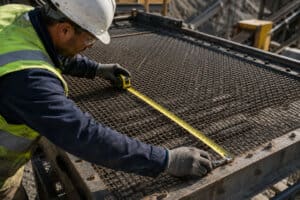
Ordering the wrong replacement screen can lead to costly downtime, installation problems, and reduced screening performance. Before ordering a replacement, it’s important to gather accurate measurements and equipment specifications to ensure the screen fits correctly and performs as intended. Perhaps the most important reason to measure carefully is to keep downtime to a minimum. A screen that doesn’t fit properly will take more time to install (assuming it can be installed) and may be subject to premature wear, blinding problems, and reduced efficiency.
Some other common problems caused by a poorly fitted screen are inaccurate tensioning, lower-quality material separation, reduced throughput, excessive vibration, and shortened screen life. In some cases, an incorrectly sized screen may need to be modified in the field or replaced altogether, resulting in additional expense and unnecessary downtime.
Taking a few extra minutes to gather accurate measurements before placing an order can help ensure a proper fit, maintain screening performance, and get your equipment back into operation as quickly as possible. In this guide, we’ll walk through the key measurements and equipment information you should have on hand before you order a replacement screen.
At-a-Glance: Measuring a Replacement Screen
Before placing your order for a replacement screen, gather the following measurements:
- Overall screen length
- Overall screen width
- Screen opening size (aperture)
- Wire diameter
- Plate thickness and bar size between holes for perforated plate screens
- Hook dimensions, if applicable
- Hook tensioning: side or end
- Crossbar spacing, if applicable
- Screen type
- Equipment manufacturer and model
- Deck position: top or bottom
Having this information ready will help ensure your replacement screen fits correctly and performs as intended.
Why Accurate Screen Measurements Matter
As any plant manager will tell you, delays are expensive. No one wants to deal with downtime, especially preventable downtime. A replacement screen that doesn’t fit properly can delay installation, reduce screening efficiency, and keep equipment out of service longer than necessary. Because efficiency is critical in all types of screening operations, taking a little extra time upfront to verify your measurements is always worthwhile.
In addition to protecting uptime, a properly fitted screen will typically last longer and deliver more accurate screening results. If a screen is even slightly smaller than the frame, undersized material may bypass the screening surface through gaps around the edges. Material can also become trapped in these gaps, leading to screen blinding, reduced throughput, and additional maintenance time. Improper tensioning caused by incorrect dimensions can further accelerate wear and shorten screen life.
A properly sized screen fits securely, tensions correctly, and performs as intended, helping maintain production efficiency, product quality, screen life, and accurate material separation.
Tools You’ll Need
Most screen measurements can be taken using basic tools commonly found in a maintenance shop. Having the right tools on hand will help ensure your measurements are as accurate as possible.
- Tape measure
- Calipers, micrometer, or Samscreen screen gauge
- Straight edge
- Notepad or smartphone for recording measurements
Gathering your tools before you begin will make the measuring process smoother and more efficient.
Step 1: Measure Overall Screen Length and Width
What to Measure
- Overall length
- Overall width
Best Practices
- Measure the existing screen after removal if possible
- Measure the screen on a flat surface and record the maximum overall length and width, including hooks when applicable
- Identify which dimension is the hook length, if there is an overlap, and which dimension is the OHF (outside hook flange) and which is the ISB (inside bend)
- Record measurements to the nearest 1/16 inch or millimeter
A note on screens with hooks: If your screen is a side-tensioned screen, it’s recommended to measure to the outside of the hooks on the screen. Alternatively, if your screen is an end-tensioned screen, then it is recommended to measure to the inside of the hooks.
Step 2: Identify the Screen Type
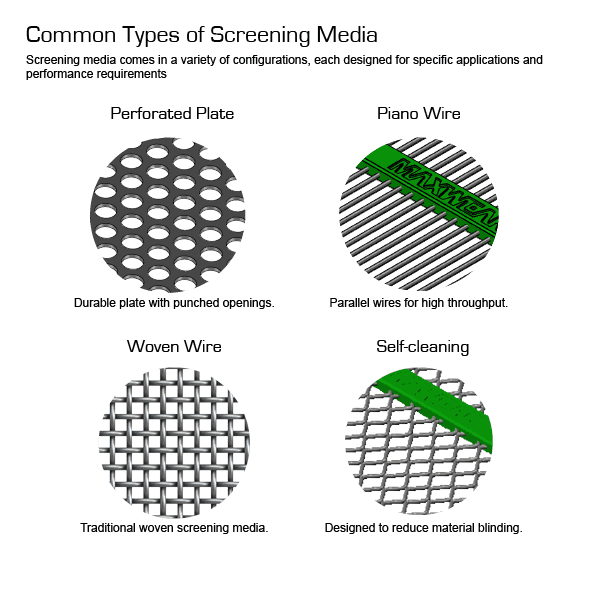
Common Screen Types
- Hooked screens
- Flat screens
- Tensioned screens
- Modular panels
- Self-cleaning screens
- Wire cloth screens
Why Screen Type Matters
- Different mounting methods require different measurements
- Affects manufacturing specifications
Unlike flat or modular screens, tensioned screens are manufactured with the expectation that they will be pulled tight in the machine during installation. However, tensioning is not a substitute for accurate measurements. The screen still needs to be manufactured to the correct overall dimensions, hook style, hook orientation, and deck requirements. If the screen is made too small or too large, it may not tension evenly, which can reduce screening accuracy and shorten screen life.
Step 3: Measure Screen Opening Size
How to Measure Aperture Size
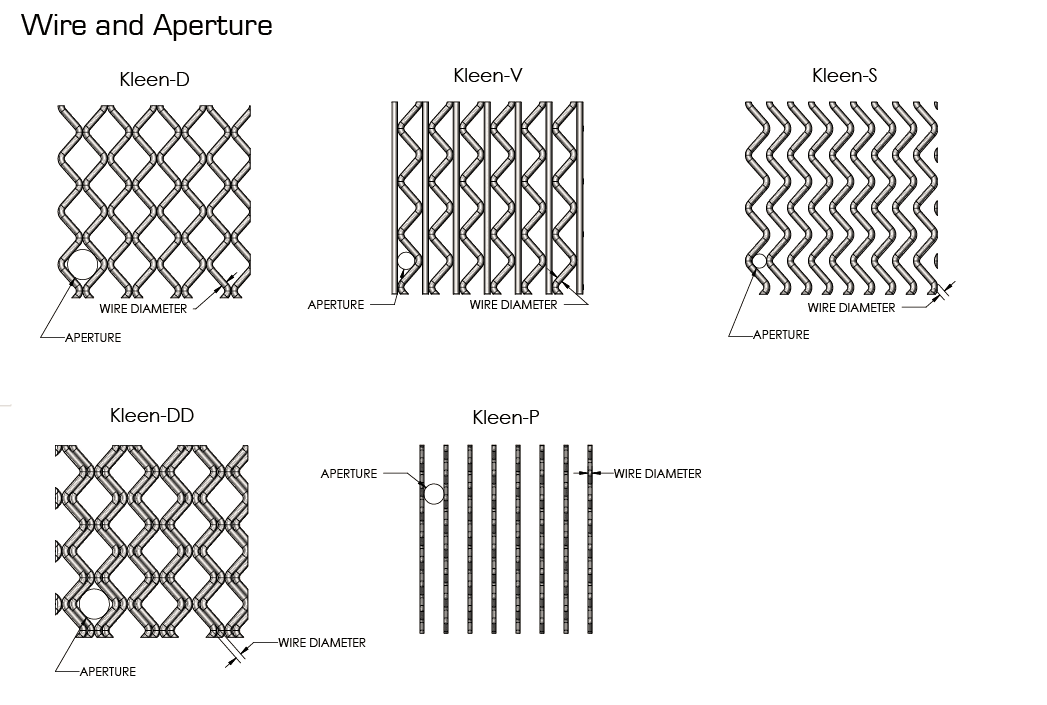
Wire diameter and aperture examples.
Aperture refers to the clear opening between wires. Wire diameter refers to the thickness of the wire itself.
Use a caliper to measure the aperture (clear opening) of the screen. For the most accurate result, use a Samscreen wire gauge to measure several openings in different areas of the screen and calculate the average. This helps compensate for wear, wire deformation, or manufacturing variations.
Measurement Tips
- Measure the clear opening between adjacent wires, not the wire diameter.
- Take measurements in both directions if the opening is rectangular.
- Avoid measuring damaged or excessively worn areas when possible.
- Record dimensions in inches or millimeters.
Record the Opening Shape
- Square
- Rectangular
- Hexagonal
- Slotted
Examples
- 1/2″ square opening
- 3/8″ × 1″ slotted opening
- 6 mm hexagonal opening
Note: Aperture size is one of the most important specifications for identifying replacement screen media, so accurate measurements are essential. If the opening is hexagonal, it is important to measure across the flats and not the angle.
Screen Details That Can Affect Fit and Measurement
Opening size is important, but it is only one part of measuring a replacement screen. Depending on the screen type, other details such as edge construction, hook style, side seals or side laps, support bars, and deck configuration may also affect how the screen is measured, built, and installed.
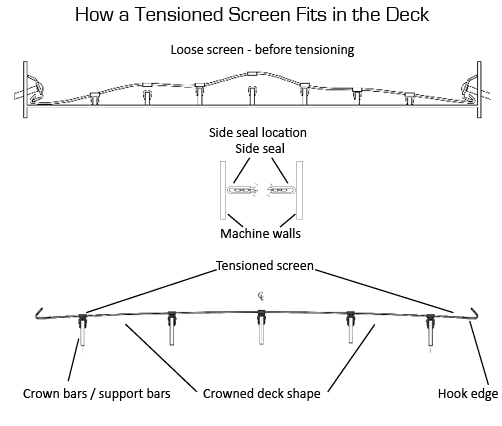
A replacement screen is tensioned across the machine’s deck. If the deck has a slight crown created by support bars, the screen follows that shape when installed. Hook style, support bar layout, and deck configuration can all affect fit.
Step 4: Measure Wire Diameter
Why Wire Diameter Is Important
Wire diameter plays a major role in screen performance and service life. When selecting screen media, there is often a tradeoff between durability, open area, and throughput.
Generally, heavier wire provides greater strength and wear life, which can help extend the service life of the screen. However, thicker wire also reduces the amount of open area available for material to pass through, which may affect screening efficiency and throughput. It can also dampen screen vibration, which may further restrict material flow.
Accurately measuring wire diameter is also important when identifying an existing screen. Two screens may have the same opening size but different wire diameters, resulting in different performance characteristics.
Measurement Method
- Use calipers for the most accurate measurement.
- Measure the diameter of the wire itself, not the opening between wires.
- Take measurements on several wires in different areas of the screen.
- Average the results to account for wear and manufacturing variations.
- Record the measurement in inches or millimeters.
Example
- 0.120″ wire diameter
- 3 mm wire diameter
Step 5: Record Crossbar Locations and Spacing
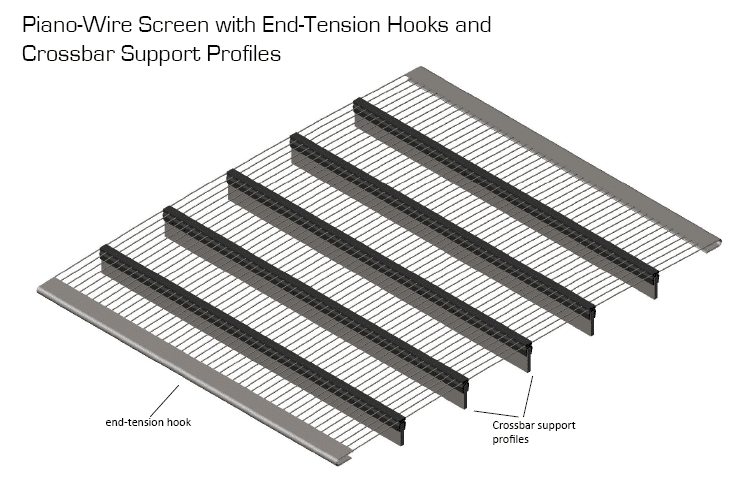
Why Crossbar Information Matters
Crossbars support the screen and help maintain proper tension during operation. To protect both the screen and the support structure, replacement screens are often supplied with polyurethane wear strips (poly strips) or support profiles that sit between the screen and the crossbars.
To ensure these wear strips are positioned correctly, it is important to record the number of crossbars and the spacing between them. Accurate measurements help ensure proper fit, support, and wear protection.
Identify and Record the Support Profile
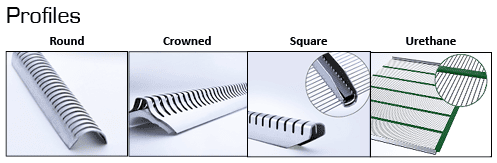
Crossbars may utilize support profiles or wear strips that help protect both the screen and the support structure. Use the illustrations above to identify the support profile installed on your machine, then record the profile type when submitting your screen measurement information.
Common Support Profile Types
- Round
- Crowned
- Square
- Urethane
Providing the correct profile information helps ensure proper fitment, support, and screen life.
Measure Crossbar Locations and Spacing
- Count the total number of crossbars supporting the screen.
- Measure the distance between adjacent crossbars.
- Record spacing from center-to-center whenever possible.
- Note any irregular spacing or unique support configurations.
Example
- 4 crossbars
- 12 in. center-to-center spacing
- Evenly spaced across the screen deck
Notes: Some equipment manufacturers refer to secondary support members as bucker bars. If your screen deck includes bucker bars or other intermediate supports, be sure to record their location and spacing as part of the support layout. For end-tensioned screens, measure support bar locations from the anchor end of the screen box. For side-tensioned panels, measure from the machine centerline outward to each side.
Step 6: Measure Hook Specifications (If Applicable)
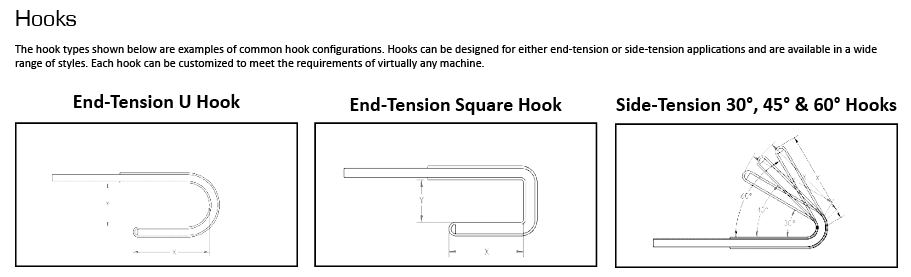
Certain screen types (see screen types section above) have mounting hooks attached to either the sides or the ends. These hooks come in a variety of types. Common examples include end-tension U-hooks, end-tension square hooks, and side-tension hooks set at different angles. The hook types illustrated below are examples of some common types. However, hooks can be customized to fit any machine.
Record:
- Hook style
- Hook height
- Hook angle
- Hook length
Step 7: Determine Deck Position and Equipment Information
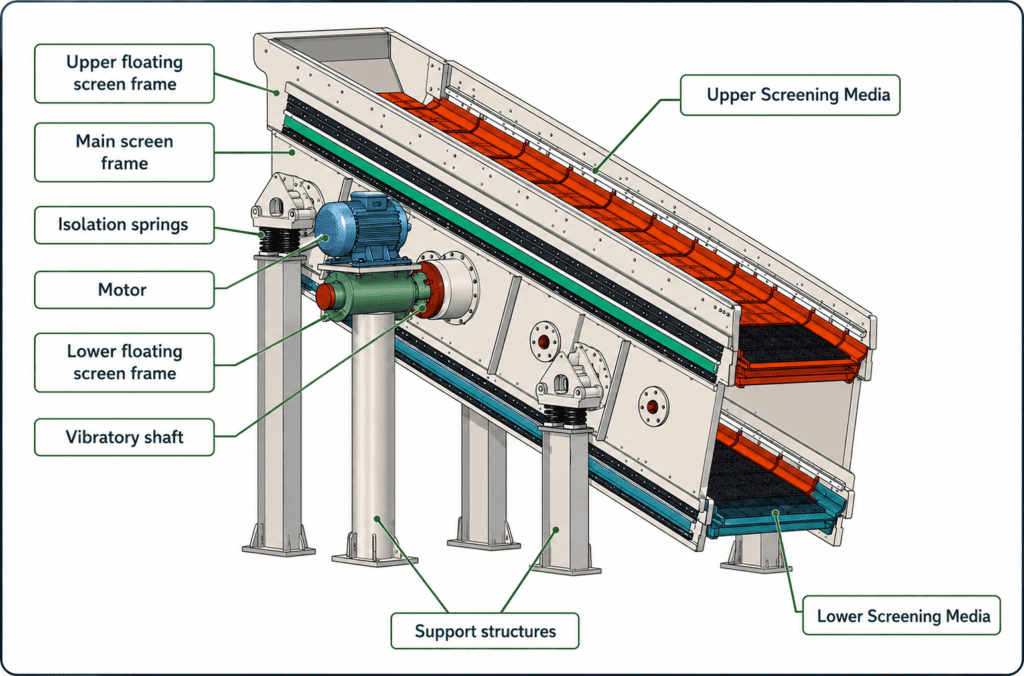
Gather:
- Manufacturer
- Equipment model
- Deck location (top, middle, bottom)
- Application material
Why This Helps
- Samscreen can verify screen compatibility. We keep OEM specifications on file and can validate your screen specifications and measurements.
Step 8: Document Additional Requirements
Why Additional Requirements Matter
In addition to basic screen measurements and specifications, it’s important to document any special requirements that may affect screen performance, wear life, or compatibility with your equipment.
The more information you can provide about your application and existing screen setup, the easier it will be to recommend or manufacture the correct replacement screen.
Pay particular attention to wire material, screen media type, and any modifications that have been made to the screening equipment.
Information to Record
Wire Material
Different wire materials are designed for different operating conditions.
- High-carbon wire and piano wire: Commonly used for heavy-duty applications and abrasive materials in dry or damp conditions.
- Stainless steel wire: Recommended for wet, sticky, corrosive, or contamination-sensitive applications.
Screen Media Type
If you are replacing an existing screen, note the type of media currently being used:
- Woven wire cloth
- Piano wire
- Self-cleaning screen media
- Punch plate
Equipment Modifications
Record any changes that may affect screen fitment or support, including:
- Additional or relocated crossbars
- Modified screen dimensions
- Custom support structures
- Previous repairs or alterations
- Custom edge reinforcements
- For MAXKleen screens, record any side laps or side-edge overlaps required for proper fitment. Note the lap width, which side of the panel it is located on, and whether the lap affects the overall screen width, sealing surface, or tensioning area.
Common Measurement Mistakes to Avoid
Now that we’ve covered the process of measuring a screen for replacement, it’s worth reviewing some of the most common mistakes that can lead to delays, ordering errors, or screens that do not fit properly.
By taking accurate measurements and recording all relevant information, you can help ensure that your replacement screen matches your equipment and application requirements.
Measuring Worn Openings
Excessive wear can enlarge screen openings over time, resulting in inaccurate aperture measurements. Measure several openings and average the results, or compare measurements to original specifications when available.
Forgetting Hook Dimensions
Hook style and dimensions are critical for proper screen fitment. An otherwise correct screen may not install properly if the hooks do not match the existing setup.
Recording Nominal Instead of Actual Dimensions
Screens are often referred to by nominal sizes, but actual dimensions can vary between manufacturers and equipment models. Always measure and record the actual screen dimensions.
Not Specifying Measurement Units
Be sure to record whether measurements are in inches or millimeters. Omitting units can lead to confusion and costly ordering errors.
Omitting Equipment Information
When available, record the equipment manufacturer, model number, and serial number. This information can help verify measurements and identify the correct replacement screen specifications.
Overlooking Crossbar Layout and Support Profiles
Failing to record the number and spacing of crossbars—or the type of support profile being used—can result in improper screen support and wear protection. Be sure to document any support strips, wear strips, or profile styles used on the deck.
With a little preparation and attention to detail, you can avoid these common mistakes and help ensure a smooth replacement process.
Information to Provide When Ordering a Replacement Screen
Once you have gathered your measurements and specifications, take a few minutes to review your information before contacting Samscreen or your Samscreen dealer. Providing complete and accurate information helps ensure the correct replacement screen is identified, quoted, and manufactured for your application.
Use the following checklist to verify that you have everything you need:
Before requesting a quote, gather as much of the following information as possible:
- ☐ Screen length
- ☐ Screen width
- ☐ Opening size / aperture
- ☐ Wire diameter
- ☐ For punch plate: plate thickness and bar size between holes
- ☐ Hook style and dimensions
- ☐ Screen type or media type
- ☐ Number and position of crossbars
- ☐ Support profile type, if applicable
- ☐ Equipment make and model
- ☐ Material being screened
- ☐ Special requirements or equipment modifications
Even with careful preparation and accurate measurements, you may not be able to identify every screen specification. Common challenges include:
- Missing original specifications
- Damaged screens that are difficult to measure
- Custom applications
- Obsolete equipment models
- Equipment that has been altered or repaired
If you’re missing any of this information, Samscreen (or your Samscreen dealer) can help you identify the correct specifications and recommend or design the right replacement screen for your application and equipment.
Conclusion
Identifying a replacement screen doesn’t have to be complicated. By gathering accurate measurements, documenting screen specifications, and recording equipment details, you can help ensure the correct screen is selected for your application.
Taking the time to measure items such as aperture size, wire diameter, hook dimensions, crossbar spacing, and support profiles can help prevent ordering errors.
If you are unsure about any aspect of the identification process, a Samscreen screening expert can help verify measurements and recommend the best replacement solution for your equipment and operating conditions.
FAQs
Can I measure a screen while it is installed?
Yes, but removing the screen generally provides more accurate measurements.
What if my screen is damaged or stretched?
Measure multiple areas and consult Samscreen or your Samscreen dealer for verification.
Do I need to know the wire diameter?
Yes. Wire diameter affects performance, durability, and fit.
What information should I send when requesting a quote?
Provide dimensions, opening size, wire diameter, hook details, equipment manufacturer and model, and deck position (top, bottom, or middle).
How accurate do my measurements need to be?
As accurate as possible. Small measurement errors can result in improper fit and reduced performance.
How do I measure screen opening size?
The best method is to use a caliper to measure multiple openings in varying areas of the screen and then calculate the average size from the dimensions you have recorded.
Do I measure the wire or the opening?
Both measurements are essential. Aperture size determines material separation, while wire diameter affects open area, throughput, and screen durability.
Why is wire diameter important?
Wire diameter is important because it directly affects how much open space you have to produce throughput.
Can I measure a worn screen accurately?
Yes, in most cases you can. Take several measurements in various areas of the screen and then get an average of the results.
What if I don’t know the original screen specifications?
We likely have the OEM specifications for your screen. If you don’t know the original screen specifications, the next best thing to find is the manufacturer and model.
Do I need to provide the make and model of my screening equipment?
Yes, if at all possible, it is very important to provide the make and model information for your equipment.
Why do crossbar locations matter?
The crossbar locations matter because Samscreen will place support profiles where the crossbars are located.
What are support profiles?
Support profiles protect both the screen and the screenbox from wear and tear.
What if my equipment has been modified or repaired?
If your equipment has been modified or repaired, it is a good idea to measure the equipment itself and notify Samscreen or your dealer that your equipment no longer adheres to OEM specifications.
Can a manufacturer identify my screen if some measurements are missing?
Yes, especially if you know the make and model of your equipment.